


The backup node and DR server don’t need to share SSH keys. Here’s how pgBackRest’s native TLS transport provides certificate-authenticated restores and strict security isolation, making it the cleaner choice for isolated or large-scale recovery environments.
SSH Gets the Job Done Securely. TLS Can Help at Scale.
If you’ve read the pgBackRest DR guide on this blog, you already know the standard setup: two servers, passwordless SSH, pgBackRest pulling backups across the wire. It works reliably, and it’s what most teams run.
SSH works well for small deployments. The challenge emerges at scale: as the number of machines grows, managing individual key pairs, distributing them, rotating them, and auditing who has what becomes increasingly complex. SSH also supports host-based authentication, where host keys are used to authenticate connections in an Ident-like model, which simplifies certain setups. But, enforced key rotation across a large fleet remains genuinely difficult.
In essence, TLS works with the X.509 public key infrastructure to manage and verify public keys. Rather than pre-sharing them, the key owner can provide them embedded in a certificate that includes more information about who the key belongs to, the validity period, and so forth. A certificate authority then signs the certificate. The receiver of the key only needs to know the certificate authority’s public key to verify it and then decide whether to trust it.
As a result, rather than pre-sharing keys to validate authentication, this allows fewer keys to be shared initially, thereby improving management at scale. That’s exactly the problem pgBackRest’s TLS server mode solves, although this now adds a new layer of systems to manage in the certificate authorities.
Security Isolation and Lateral Movement
Beyond scale, TLS mode also changes the access model more fundamentally. Unless explicitly restricted with a forced command, an SSH key grants shell access to the host it authenticates to. If a DR server is compromised, any SSH key stored on it can be used for lateral movement toward the Backup Node and, from there, potentially the Primary DB Node, regardless of whether that key was ever used for anything beyond legitimate, authorized restores.
pgBackRest’s TLS mode removes that specific risk. The DR server doesn’t hold a key that grants shell access anywhere; it holds a certificate that authenticates to a dedicated TLS daemon (listening on port 8432 by default) that understands nothing beyond the pgBackRest protocol. That daemon enforces application-level access, not OS-level shell access, so even a fully compromised DR server gives an attacker nothing more than what the tls-server-auth line on the Backup Node permits for that stanza. There’s no shell to pivot from, and no host-level foothold on the Backup Node to escalate from. This significantly narrows the blast radius of a DR environment compromise compared to an SSH-based setup.
How does pgBackRest TLS Mode Work?
Instead of relying on SSH, pgBackRest runs a lightweight TLS server daemon on the backup node (port 8432 by default). Any client that presents a valid certificate signed by a shared Certificate Authority can connect to and access the stanzas it is authorized for.
The access control model works via: tls-server-auth=<cert-CN>=<stanza-name>. A client connecting with CN dr-server gets access to the db stanza.
In standard X.509, removing access to a certificate that hasn’t yet expired is done through a Certificate Revocation List (CRL), a file published by the CA that lists certificates that have been invalidated. In a normal PKI setup, this CRL file would need to be distributed to every machine that performs certificate verification, and those machines would check it on each connection. pgBackRest does not support CRLs. There is nowhere to place a CRL file that pgBackRest will read.
This means that in pgBackRest, access removal is handled entirely at the authorization layer: remove the tls-server-auth=<CN>=<stanza> line from the Backup Node’s config and restart the TLS server daemon. The certificate itself remains cryptographically valid, but the server will no longer grant it access to any stanza. If a certificate is compromised, you should also reissue a new certificate with a different CN to ensure the old CN cannot be reused.
Both sides verify each other. The DR server checks the backup node’s certificate. The backup node checks the DR server’s certificate. Neither side gets in without passing that mutual handshake.
What We Need Before Starting
- A fresh DR server (RHEL 9 in this guide) with enough disk for your restored data
- Your existing Backup Node is running pgBackRest with a populated repository
- openssl available on both machines
- Port 8432 open on the Backup Node firewall
- The Primary DB Node is not touched at any point in this process. It keeps running normally.
Step 1: Get the DR Server Ready
Install PostgreSQL and pgBackRest
sudo dnf install -y https://download.postgresql.org/pub/repos/yum/reporpms/EL-9-x86_64/pgdg-redhat-repo-latest.noarch.rpm
sudo dnf -qy module disable postgresql
sudo dnf install -y postgresql15-server
sudo dnf install -y https://dl.fedoraproject.org/pub/epel/epel-release-latest-9.noarch.rpm
sudo dnf install -y libssh2 pgbackrest
Step 2: Build the Certificate Infrastructure
Please Note: While running a certificate authority for demo purposes here is illustrative, is adds important operational liabilities. Certificates must be monitored for expiration, long-term CA root certificates must be renewed and distributed, and more.
In most cases, this approach will be used by companies running their own certificate authorities already. Because TLS’s public key infrastructure (X.509) and LDAP are both derivatives of the same X.500 family of standards, in most systems, LDAP and certificate authority systems end up tightly coupled, for example, see Microsoft’s Certificate Server in Active Directory environments.
The following section is thus included purely for demonstration purposes. They are included because they show the inner workings of an X.509 certificate authority, but would not be ideal in production. For small environments, LetsEncrypt can be used if you wish to go this route. If you wish to self-host, we recommend that you evaluate open source certificate management solutions.
This is the heart of TLS mode. We need three things:
- A Certificate Authority (CA) signs both sides of the certificates
- A server certificate for the Backup Node
- A client certificate for the DR server
Everything lives in /etc/pgbackrest/certs/ on both machines.
Please note that pgBackRest does NOT support certificate revocation lists, so revoking a certificate in this system is a bit of a pain and may be covered in a future blog entry.
2.1 Create the CA on the Backup Node
sudo mkdir -p /etc/pgbackrest/certs
cd /etc/pgbackrest/certs
sudo openssl genrsa -out ca.key 4096
sudo openssl req -new -x509 -days 3650 -key ca.key \
  -subj "/CN=pgBackRest-CA" \
  -out ca.crt
sudo chmod 600 ca.key
sudo chmod 644 ca.crt
This CA is the root of trust. Both the backup node’s server certificate and the DR server’s client certificate will be signed by it.
2.2 Create the Backup Node’s Server Certificate
Replace <BACKUP_NODE_DNS> with the actual hostname or IP address the DR server will use to reach this machine:
cd /etc/pgbackrest/certs
sudo openssl genrsa -out server.key 4096
sudo openssl req -new -key server.key \
  -subj "/CN=<BACKUP_NODE_DNS>" \
  -out server.csr
sudo openssl x509 -req -days 3650 -in server.csr \
  -CA ca.crt -CAkey ca.key -CAcreateserial \
  -out server.crt
sudo chmod 600 ca.key server.key
sudo chmod 644 server.crt ca.crt
sudo chown -R postgres:postgres /etc/pgbackrest/certs
Note: We use a bare /CN= here for clarity. In production, it is better to specify the full Distinguished Name path. For example:
-subj "/C=US/ST=California/O=YourOrg/OU=Database/CN=backup-node.example.com"This provides a richer identity context and is the correct approach in enterprise environments. The bare CN form is used here for demonstration purposes only.
2.3 Create the DR Server’s Client Certificate
On the DR server:
sudo mkdir -p /etc/pgbackrest/certs
cd /etc/pgbackrest/certs
sudo openssl genrsa -out client.key 4096
sudo openssl req -new -key client.key \
  -subj "/CN=dr-server" \
  -out client.csr
The CN here, dr-server, is what the Backup Node will use to identify and authorize this client. It needs to match exactly what we put in tls-server-auth later.
2.4 Sign the Client Certificate (on the Backup Node)
Since these servers don’t share SSH access, the exchange is manual. Print the CSR from the DR server:
# On the DR server:
cat /etc/pgbackrest/certs/client.csr
Copy the entire block to the Backup Node, paste it into a file, then sign it:
# On the Backup Node:
sudo vi /etc/pgbackrest/certs/client.csr
cd /etc/pgbackrest/certs
sudo openssl x509 -req -days 3650 -in client.csr \
  -CA ca.crt -CAkey ca.key -CAcreateserial \
  -out client.crt
2.5 Transfer the Signed Certificate Back
Print both the signed certificate and the CA cert from the Backup Node:
cat /etc/pgbackrest/certs/client.crt
cat /etc/pgbackrest/certs/ca.crt
On the DR server, create both files and set permissions:
sudo vi /etc/pgbackrest/certs/client.crt
sudo vi /etc/pgbackrest/certs/ca.crt
sudo chmod 600 /etc/pgbackrest/certs/client.key
sudo chmod 644 /etc/pgbackrest/certs/client.crt /etc/pgbackrest/certs/ca.crt
sudo chown -R postgres:postgres /etc/pgbackrest/certs
Step 3: Configure the TLS Server on the Backup Node
Edit /etc/pgbackrest.conf on the Backup Node. If we already have a backup configuration here, add the TLS server block to the existing [global] section:
[global]
repo1-path=/var/lib/pgbackrest
repo1-retention-full=2
log-level-console=info
log-level-file=debug
# TLS server configuration
tls-server-address=*
tls-server-port=8432
tls-server-cert-file=/etc/pgbackrest/certs/server.crt
tls-server-key-file=/etc/pgbackrest/certs/server.key
tls-server-ca-file=/etc/pgbackrest/certs/ca.crt
# CN of the DR server's certificate → stanza it can access
tls-server-auth=dr-server=db
[db]
pg1-path=/var/lib/pgsql/15/data
The tls-server-auth line is our access control. dr-server (the CN from the client cert) is permitted to access the db stanza. Add more lines for additional clients or stanzas.
Create a systemd service to run the listener:
sudo tee /etc/systemd/system/pgbackrest.service > /dev/null << 'EOF'
[Unit]
Description=pgBackRest TLS Server
After=network.target
[Service]
User=postgres
ExecStart=/usr/bin/pgbackrest server
Restart=on-failure
[Install]
WantedBy=multi-user.target
EOF
sudo systemctl daemon-reload
sudo systemctl enable --now pgbackrest
sudo systemctl status pgbackrest
Confirm port 8432 is open on the Backup Node’s firewall before moving on.
Step 4: Configure pgBackRest on the DR Server
Create the directory where data will be restored:
sudo mkdir -p /var/lib/pgsql/15/restored-data
sudo chown postgres:postgres /var/lib/pgsql/15/restored-data
Edit /etc/pgbackrest.conf on the DR server, replacing <BACKUP_NODE_DNS> with the Backup Node’s actual hostname or IP:
[global]
repo1-host=<BACKUP_NODE_DNS>
repo1-host-type=tls
repo1-host-port=8432
repo1-host-cert-file=/etc/pgbackrest/certs/client.crt
repo1-host-key-file=/etc/pgbackrest/certs/client.key
repo1-host-ca-file=/etc/pgbackrest/certs/ca.crt
log-level-console=info
[db]
pg1-path=/var/lib/pgsql/15/restored-data
The key difference from an SSH-based setup: instead of repo1-host-user and SSH keys, we have repo1-host-type=tls and certificate paths. No user account on the remote machine. No authorized_keys. Just certificates.
Step 5: Verify the Connection
Before attempting a restore, confirm the DR server can reach the repository and list backup sets:
sudo -u postgres pgbackrest --stanza=db info
A successful response looks like this:
stanza: db
    status: ok (has backups)
    cipher: none
    db (current)
        wal archive min/max (15): ...
        full backup: ...
If we see a TLS handshake error, the most common causes are:
- tls-server-auth CN doesn’t match the CN in the client certificate exactly
- ca.crt on the DR server isn’t the same CA that signed the server certificate
- Port 8432 is blocked
Step 6: Restore
Latest Backup
sudo -i -u postgres
pgbackrest --stanza=db \
  --pg1-path=/var/lib/pgsql/15/restored-data \
  --process-max=4 \
  --log-level-console=info \
  restore
Point-in-Time Recovery (PITR)
pgbackrest --stanza=db \
  --pg1-path=/var/lib/pgsql/15/restored-data \
  --type=time \
  --target="2026-05-12 11:30:00" \
  --target-action=promote \
  --process-max=4 \
  --log-level-console=info \
  restore
pgBackRest transfers all files over TLS and writes recovery configuration to postgresql.auto.conf. PostgreSQL will replay WAL automatically on startup.
Step 7: Disable Archiving Before Starting PostgreSQL
This step is easy to overlook and genuinely dangerous. The restored postgresql.conf still has archive_command pointing at your live backup repository. Starting the DR instance with archiving enabled will cause it to write WAL segments into your production archive, mixing DR WAL with production WAL and potentially corrupting your backup chain.
vi /var/lib/pgsql/15/restored-data/postgresql.conf
Set:
archive_mode = off
Step 8: Start and Validate
sudo -i -u postgres
/usr/pgsql-15/bin/pg_ctl -D /var/lib/pgsql/15/restored-data -l /var/lib/pgsql/15/dr-logfile start
Basic health checks:
psql -U postgres -c "SELECT now();"
psql -U postgres -c "\l+"
TLS vs SSH: When Does Each Make Sense?
Both transport modes are production-grade. The choice comes down to our operational model:
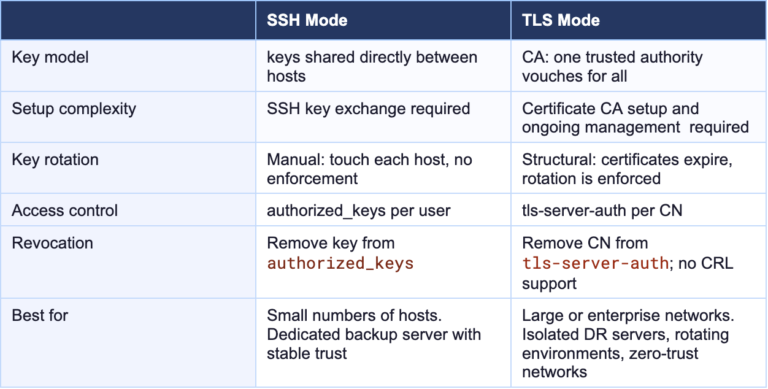
Neither is inherently more secure; both use strong cryptography. TLS mode tends to be cleaner when the DR server is ephemeral, when it lives in a different security zone. The TLS approach trades setup simplicity for better operational scalability, and it integrates naturally into enterprise environments that already manage certificates through Active Directory or similar infrastructure.
Closing Thought
A backup we’ve never restored is not a backup; it’s a hope. TLS mode makes it practical to run restore drills on a fully isolated server, with no SSH relationship to anything in production and no risk of touching the live environment.
What it buys is a simpler key distribution model. Instead of pre-sharing individual public keys with every machine that needs repository access, we distribute one CA public key and let it vouch for all participants. That means fewer keys to track, rotation that is structurally enforced through certificate expiry, and access control that fits naturally into the certificate infrastructure many enterprises already operate.
The tradeoff is real: certificate expiry monitoring, CA lifecycle management, and the absence of CRL support in pgBackRest all require deliberate operational attention. Go in with clear answers for certificate lifecycle management, and TLS mode will serve well across any number of DR drills and real recovery events.
Our PostgreSQL Disaster Recovery Services help teams design, validate, and test recovery environments that account for these operational details, from backup architecture and restore drills to secure access models and recovery readiness.