
Pre-Upgrade Considerations
Before proceeding with the upgrade, take some time to consider the following scenarios.
Backup Your Cluster- Create a full backup of your PostgreSQL data to avoid any data loss in case something goes wrong during the upgrade process.
- Check the release notes of the new version for breaking changes, deprecated features, and important updates that could affect your current configuration.
- Ensure your system meets the hardware and software requirements (disk space, memory, CPU) necessary for the new version of PostgreSQL.
- Verify the compatibility of third-party extensions, plugins, or custom configurations with the new PostgreSQL version, as some may require updates or replacements.
Methods for PostgreSQL Upgrades
Minor Version Upgrades- These involve moving from one minor version to another (e.g., 14.2 to 14.3).
- This process is generally simple and involves downloading the newer version’s binaries through the installer for Windows or using apt-get update on Linux, followed by restarting the PostgreSQL service.
- No changes to the data directory are needed, making it quick and safe.
- Major upgrades (e.g., 13.x to 14.x) involve changes in the internal structure and features, requiring more steps.
- Data migration is essential, either using tools like pg_upgrade or by dumping and restoring the database.
- Logical replication can be used to upgrade with minimal downtime.
- You set up a new cluster, replicate data from the old cluster to the new one, and then switch over once all data is replicated.
Overview of pg_upgrade
pg_upgrade is a powerful tool designed to simplify the process of upgrading a PostgreSQL cluster from one major version to another. It allows you to migrate your data quickly without the need to perform a full dump and restore of your database, making it highly efficient for large databases.Performing upgrades on Windows
In this setup, we will utilize the following specifications
- Windows Server 2019 (Basic)
- Older PostgreSQL Version: 10
- Newer PostgreSQL Version: 16
- Tool: pg_upgrade
Setting up PostgreSQL10(oder) cluster
Visit this URL to download the PostgreSQL 10 installer. Once the download is complete, proceed with the installation; installation steps for PostgreSQL are not covered in this blog.
I installed PostgreSQL 10 using all the default settings.After configuring the PostgreSQL 10 cluster, download the PostgreSQL 16 installer from the same URL.Install PostgreSQL 16 using the default settings.At this point, we assume that both the PostgreSQL 10 and PostgreSQL 16 clusters are up and running on your Windows machine.Update authentication methods for both servers
I’m using this method for simplicity, as it allows PostgreSQL to connect to the server without requiring a password.
Navigate to the data directory of PostgreSQL 10 and open the pg_hba.conf file. At the bottom of this file, replace the “md5” authentication method with the “trust” keyword.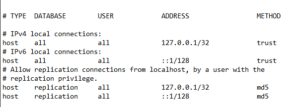 Repeat this process for PostgreSQL 16, but instead of “md5,” replace the “scram-sha-256” keyword with “trust.”
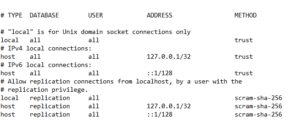 Finally, save both files.NOTE: Make sure to revert this change after successful upgrade
Restart/Stop the PostgreSQL services
Open the Windows Service Manager and restart the PostgreSQL 10 and PostgreSQL 15 services.
After the services have restarted, proceed to manually stop both of them.Examine the health of the clusters with pg_upgrade –check
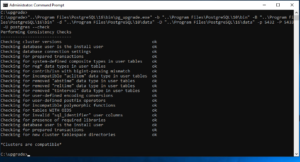
Now it’s time to assess the compatibility of both clusters. pg_upgrade offers a check flag that allows you to perform several checks on the clusters before starting the upgrade. This will run various tests and ultimately indicate the health of the clusters.
Upgrade the cluster
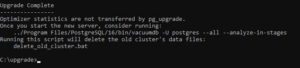
Once we confirm that both clusters are healthy for the upgrade, we can proceed with the upgrade without using the check flag for pg_upgrade.
Open the Windows Command Prompt as an Administrator and execute the following command.NOTE: Make sure to replace the variables according to your system."<PATH_TO_PG_UPGRADE_UTILITY>\pg_upgrade.exe" -b "<POSTGRES_10_PATH>\bin" -B "<POSTGRES_15_PATH>\bin" -d "<POSTGRES_10_DATA_DIRECTORY_PATH>\10\data" -D "<POSTGRES_15_DATA_DIRECTORY_PATH>\15\data" -p <POSTGRES_10_PORT> -P <POSTGRES_15_PORT> -U postgres- <POSTGRES_10_DATA_DIRECTORY_PATH> The data directory of the older PostgreSQL version (10), containing the data files to be upgraded.
- <POSTGRES_15_DATA_DIRECTORY_PATH> The target data directory for the newer PostgreSQL version (15), where the upgraded data files will be placed
- <PATH_TO_PG_UPGRADE_UTILITY> The location of the pg_upgrade utility executable that performs the upgrade.
- <POSTGRES_10_PATH> The path to the binary directory of the older PostgreSQL version (10), where its executables are stored.
- <POSTGRES_15_PATH> The path to the binary directory of the newer PostgreSQL version (15), where its executables are stored.
- <POSTGRES_10_PORT> The port number on which the older PostgreSQL version (10) is running, used for connecting to the server.
- <POSTGRES_15_PORT> The port number for the newer PostgreSQL version (15), used for connecting to the upgraded server.

 Start PostgreSQL 16 service from windows service manager now!
Rollback Plan
Having a well-defined rollback plan is essential when upgrading your PostgreSQL cluster, as it ensures that you can quickly revert to the previous version if anything goes wrong. Here are the key components to consider for an effective rollback plan:Backup Before Upgrade- Always create a complete backup of your existing PostgreSQL cluster before initiating the upgrade. Use tools like pg_baseackup to ensure you capture all databases, roles, and configurations. Store this backup in a secure location.
- Record the current PostgreSQL configuration settings and environment details. This documentation will help you restore the system to its original state if needed.
- If possible, conduct a test run of the rollback process in a staging environment. This practice will familiarize you with the steps involved and help identify any potential issues.
- In the event of a failure during the upgrade, you can restore your backup by:
- Stopping the new PostgreSQL service.
- Reinstalling the old PostgreSQL version if necessary.
- Restoring the data from the backup using pg_restore or by replacing the data directory with the backup copy.
- After restoration, run checks to ensure that all data is intact and the database is functioning as expected. Perform consistency checks and validate critical application functionalities.
- Inform your team and stakeholders about the rollback if it occurs. Provide updates on the status of the upgrade and any implications for service availability.
- Once the rollback is completed, review the upgrade process to identify what went wrong. Analyze logs and performance metrics to understand the issues and adjust your upgrade strategy for future attempts.
Post-Upgrade Steps
After successfully upgrading your PostgreSQL cluster, it’s essential to perform several key post-upgrade tasks to ensure everything is functioning correctly and to clean up any old files. Here are the critical post-upgrade steps:Verify Cluster Health- Check the status of your new cluster by connecting to the database and running queries. Use commands like SELECT version(); to confirm the version and ensure all databases are accessible.
- Once you’ve confirmed that the upgrade was successful, you can safely remove the old data directory. This step helps free up disk space and keeps your system organize
- Run your application and perform tests to check that all functionalities are working as expected.
- Monitor the performance of the new version, comparing it with the previous version to ensure improvements.
- Keep an eye on the PostgreSQL log files for any errors or warnings that may appear post-upgrade. Address any issues promptly to ensure the stability of your database.
- After confirming that everything is running smoothly, perform a fresh backup of the upgraded cluster. This backup will serve as a restore point for future changes or upgrades.

