What is a 3-node cluster and why it is needed for enterprises
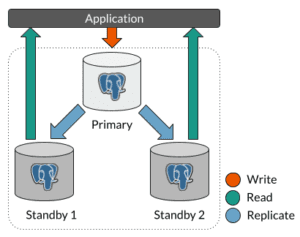
A 3-node database cluster is a setup in which 3 hosts are configured to run database server. There are 2 standby nodes and one primary node. Data in the primary node is replicated to standby nodes, if the primary node goes down one of the standby nodes is promoted to primary node to ensure that the database is highly available.
Need Help in Setting Up a 3-node Cluster? Contact Us …
Enterprises that can only afford to bear minimal loss use 3-node cluster primarily for the following reasons:
High availability: A 3-node cluster provides high availability and redundancy, ensuring that the database is always available. If the primary node fails, a standby node will take over, hence downtime will be minimized.
Load balancing: A 3-node cluster can distribute the workload across the nodes, allowing for better performance and resource utilization. The primary node will handle write requests whereas the read requests will be handled by the standby nodes.
Disaster recovery: In the event of a disaster or system failure, a 3-node cluster can ensure that data loss is minimal and can be restored from backups.
Steps to configure pg_cirrus
Here are the few terminologies that are used in pg_cirrus configuration
pg_cirrus node – This is the host where pg_cirrus will be run and pgpool will be installed
Primary node – This is the host where primary server will be installed
Standby1 node – This is the host where standby server 1 will be installed
Standby2 node – This is the host where standby server 2 will be installed
Configure pg_cirrus, Primary, Standby1 and Standby2 Nodes
Download init.sh file from pg_cirrus repository and execute it on all the nodes inside the cluster
curl -OL https://raw.githubusercontent.com/stormatics/pg_cirrus/main/3-node-cluster/init.sh
chmod +x init.sh
./init.sh
Setup passwordless SSH access from pg_cirrus node to other nodes
To ensure that the pg_cirrus node can connect to the primary, standby1, and standby2 nodes via SSH without a password, we need to enable passwordless SSH access from the pg_cirrus node. Follow these steps to set it up.
Switch to the Postgres user on all the nodes inside the cluster
sudo su postgres
Copy ~/.ssh/id_rsa.pub file content from pg_cirrus node and run the following command on primary, standby1 and standby2 nodes
mkdir -p ~/.ssh && echo '<$PG_CIRRUS_NODE_ID_RSA.PUB>' >> ~/.ssh/authorized_keys && chmod 700 ~/.ssh && chmod 600 ~/.ssh/authorized_keys
Finally test your SSH connection by connecting to each node from pg_cirrus node
NOTE
- On AWS/EC2, update the inbound rule for the primary, standby1 and standby2 node to allow All ICMP – IPv4 traffic from the pg_cirrus node.
- We need to open the PostgreSQL port (default is 5432 or the port on which the server is being installed) on primary to allow standby1 and standby2 to establish replication.
- We also need to open access from pg_cirrus node to all primary, standby1 and standby2 nodes on PostgreSQL port
- Make sure Port 9999 is open on pg_cirrus node to allow any traffic from internet. Because this is the port where Application will be connected
Copy the public key of the Postgres user to authorized_keys inside the Postgres user on pg_cirrus node
cat ~/.ssh/id_rsa.pub >> ~/.ssh/authorized_keys && chmod 600 ~/.ssh/authorized_keys
Clone pg_cirrus on pg_cirrus node
Go to $HOME of postgres user
cd $HOME
Clone pg_cirrus
git clone https://github.com/stormatics/pg_cirrus.git
cd pg_cirrus/3-node-cluster
Create a vault.yml file using Ansible vault
ansible-vault create vault.yml
You will be prompted for vault password, after entering vault password vault file will be open.
Write the following lines inside vault.yml
PSQL_SERVER_PASSWORD: <your_psql_server_password>
REPUSER_PASSWORD: <your_replication_user_password>
Create a file to store the vault password
touch vault
chmod 0600 vault
Write the vault password inside this file
Execute pg_cirrus
python3 deploy.py
Then, follow the pg_cirrus execution flow to provide the necessary information for setting up your 3-node highly available cluster.
Verify your 3-node cluster
To verify your cluster you can connect to your cluster via the pg_cirrus node from a new machine.
psql -h <pg_cirrus_node_IP> -p 9999 -d postgres -U postgresNow you are connected to your 3 node cluster and you can execute your queries
Thank you for taking the time to learn about the alpha release of pg_cirrus. We’re thrilled to announce the alpha release of pg_cirrus. While this is just the first step on our journey, we’re excited to share this early version with our community and gather feedback to help us make it even better. So stay tuned and get ready for more updates as we move forward on this exciting journey together.
For any questions or comments, please write to us at info@stormatics.tech.