
In today’s data-driven world, ensuring high availability and scalability for your PostgreSQL deployments is crucial. Traditional single-master setups can become bottlenecks, especially for geographically dispersed applications.
This is where Multi-Master, architecture comes in. This approach offers a powerful solution for achieving fault tolerance, improved performance, and geographically distributed capabilities for your PostgreSQL databases. This blog will guide you through the process of deploying a Multi-Master, Multi-Zone architecture on AWS, leveraging the capabilities of PGD stands for Postgres Distributed.
If you want to know more about Multi-Master architecture, go ahead and read this article: Understanding Multi-Master Architecture in PostgreSQL: Benefits and Trade-offs.
Architecture detail
Our cluster, we’ll utilize a total of 11 nodes(Machines), distributed as follows:
- 3 data nodes located in Region A
- 3 data nodes situated in Region B
- 2 backup nodes in each region, equipped with Barman
- 1 node designated for the PEM server
- 1 node will be used as a witness node to establish global consensus in case of location failure and it will be in Region C
- 1 node utilized for setting up this required cluster with TPA(Trusted Postgres Architect) we call it TPA node
In addition to PGD, pgd-proxy will also be installed on every data node. The primary function of pgd-proxy is to direct write traffic to the local write leader, enhancing performance.
Pre-requirements
- To access the complimentary 30-day trial period for utilizing TPA, PGD, and other tools offered by EnterpriseDB, you’ll need a subscription token. Get your token by signing up HERE.
- TPA requires AWS credentials such as SECRET_ACCESS_KEY and ACCESS_KEY_ID to automate the provisioning of nodes effectively. Follow this link to get your AWS credentials HERE.
Setup TPA node
Trusted Postgres Architect (TPA) is an open-source tool by EDB that simplifies deploying robust PostgreSQL clusters on cloud platforms like AWS. It leverages Ansible to automate configuration and provisioning based on best practices, ensuring reliable deployments for both development and production environments. TPA supports both open-source and EDB’s commercial Postgres solutions, offering flexibility for various needs.
Head over to the AWS EC2 console and craft an instance to your preference. We opted for a t2.xlarge instance with RHEL 9 as the operating system, boasting 80 GB of hard drive capacity.
To install TPA follow the steps below
Connect to the TPA node from your terminal via SSH
Switch to the root user
sudo su root
Export security credentials into your system environment
export EDB_SUBSCRIPTION_TOKEN=<TOKEN>
export PATH=/opt/EDB/TPA/bin:$PATH
export AWS_DEFAULT_REGION=<YOUR_REGION> We chose us-east-1
export AWS_SECRET_ACCESS_KEY=<ACCESS_KEY>
export AWS_ACCESS_KEY_ID=<ACCESS_KEY_ID>
Setup the EDB packages repository
curl -1sLf 'https://downloads.enterprisedb.com/<TOKEN>/enterprise/setup.rpm.sh' | sudo -E bash
Install TPA
sudo yum install tpaexec -y
Run the setup command for TPA so that it prepares your environment and downloads the required Python modules
sudo /opt/EDB/TPA/bin/tpaexec setup
After the TPA setup run self-test command to make sure that TPA is installed successfully this command will run a few default tests
tpaexec selftest
Run the configure command to create the main directory for your cluster
tpaexec configure test_cluster --cluster-bucket edb-pgd --architecture PGD-Always-ON --keyring-backend legacy --platform aws --region us-east-1 --edb-postgres-advanced 16 --redwood --pgd-proxy-routing local --no-git --hostnames-unsorted --owner semab --distribution RedHat --os-version 8 --enable-pem --enable-pgd-probes --instance-type t3.medium --location-names datacenter1 datacenter2 datacenter3 --witness-only-location datacenter3
NOTE: By default, TPA will create 3 data nodes per location/data center. If you want to use any other number of nodes use the following switches –data-nodes-per-location
Understanding the configure command
test_cluster – Upon executing the configure command mentioned above, a new directory named test_cluster will be created in the current working directory. This directory serves as the central hub for all configuration settings related to the cluster.

test_cluster/config.yml – This file acts as a repository for vital information regarding your nodes. It contains details such as which node installs which tool, the public or private IP addresses of your nodes(If you are using the bare metal machines to setup the cluster), their respective regions, group affiliations, and more.
keyring-backend – The default choice is system, but we encountered errors during implementation. Upon investigation, it seems there might be compatibility issues with headless environments. Since this feature is newly introduced in TPA, its stability remains uncertain. The fundamental idea behind a keyring is to securely store sensitive information such as usernames, keys, and passwords on the system’s most secure keyring. However, due to our utilization of a legacy switch, TPA will forego the keyring and opt to store credentials directly on the system instead.
cluster_bucket – Used to store SSH host key files for the cluster inside the AWS S3 bucket
Architecture – This switch is used to tell TPA to create an Always On multi-location structure read more HERE
Redwood – Enable Oracle compatibility within PostgreSQL
Pgd-proxy-routing – By setting this option to local means that we will route all the write queries to a local write leader in each zone. If this option is set to global that will mean we will have only one write leader and that is global all the write operations from each data center will go to the globally elected write leader
Provision the cluster
Execute the provision command to initiate the provisioning of all specified nodes on EC2, as defined in the test_cluster/config.yml file:
tpaexec provision test_cluster
This process may take some time, depending on the complexity of your architecture configurations.
Once the provision command completes its execution, you’ll observe the creation of additional files within the main test_cluster directory. These files consist of public and private keys, SSH configuration files facilitating passwordless SSH access between nodes, as well as certain Ansible configuration files.
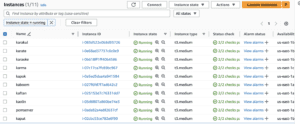
As an additional check go to your EC2 console now you will be able to see your instances being created by provision command here we have a total number of 10 nodes being created names for these machines are default
Deploy the cluster
After successful provisioning now is time to deploy the cluster. Deploy command will install all the required tools on the nodes and will make sure that our Multi-Master architecture is ready to use
tpaexec deploy test_cluster
That will now take some time
Verify the cluster
Access any PGD Node within the cluster. You can identify PGD nodes in the test_cluster/config.yml file. Here’s an example entry:
- Name: kaput
  backup: karate
  location: datacenter2
  node: 5
  role:
  - bdr
  - pgd-proxy
  - pem-agent
In my case, the node named karate serves as our data node since it has PGD (formerly named bdr) installed.
Go inside test_clusrter directory and run this command to connect to any node
ssh -F ssh_config kaput
Switch to enterprisedb user
sudo -iu enterprisedb
Cluster health check commands
enterprisedb@kaolin:~ $ pgd show-nodes
Node    Node ID    Group                Type    Current State Target State Status Seq ID
----    -------    -----                ----    ------------- ------------ ------ ------
kaboom  2710197610 datacenter1_subgroup data    ACTIVE        ACTIVE       Up     1
kaftan  3490219809 datacenter1_subgroup data    ACTIVE        ACTIVE       Up     3
kaolin  2111777360 datacenter1_subgroup data    ACTIVE        ACTIVE       Up     4
kaput   2885150576 datacenter2_subgroup data    ACTIVE        ACTIVE       Up     6
karakul 2388816231 datacenter2_subgroup data    ACTIVE        ACTIVE       Up     2
karaoke 4049140347 datacenter2_subgroup data    ACTIVE        ACTIVE       Up     7
karma   2893937153 datacenter3_subgroup witness ACTIVE        ACTIVE       Up     5

enterprisedb@kaolin:~ $ pgd show-groups
Group                Group ID   Type   Parent Group Location    Raft  Routing Raft Leader Write Leader
-----                --------   ----   ------------ --------    ----  ------- ----------- ------------
test_cluster         1409411352 global                          true  false   kaboom
datacenter1_subgroup 1488060427 data   test_cluster datacenter1 true  true    kaolin      kaftan
datacenter2_subgroup 2299288850 data   test_cluster datacenter2 true  true    karaoke     kaput
datacenter3_subgroup 4066894510 data   test_cluster datacenter3 false false

enterprisedb@kaolin:~ $ pgd show-proxies
Proxy   Group                Listen Addrs Listen Port Read Listen Addrs Read Listen Port
-----   -----                ------------ ----------- ----------------- ----------------
kaboom  datacenter1_subgroup [0.0.0.0]    6432        []
kaftan  datacenter1_subgroup [0.0.0.0]    6432        []
kaolin  datacenter1_subgroup [0.0.0.0]    6432        []
kaput   datacenter2_subgroup [0.0.0.0]    6432        []
karakul datacenter2_subgroup [0.0.0.0]    6432        []
karaoke datacenter2_subgroup [0.0.0.0]    6432        []
Testing replication
Since Kaftan is the write leader in Region A connect with kaboom and create a table to test replication
enterprisedb@kaboom:~ $ psql -h kaboom -p 6432 -d bdrdb
psql (16.3.0)
SSL connection (protocol: TLSv1.3, cipher: TLS_AES_256_GCM_SHA384, compression: off)
Type "help" for help.
bdrdb=# create table testtable (id int);
CREATE TABLE
Switch to kaolin and we can see the table created by kaboom is visible in kaolin as well
enterprisedb@kaolin:~ $ psql -h kaolin -p 6432 -d bdrdb
psql (16.3.0)
SSL connection (protocol: TLSv1.3, cipher: TLS_AES_256_GCM_SHA384, compression: off)
Type "help" for help.
bdrdb=# d
                       List of relations
 Schema |              Name              | Type  |    Owner
--------+--------------------------------+-------+--------------
 public | pg_stat_statements             | view  | enterprisedb
 public | pg_stat_statements_info        | view  | enterprisedb
 public | query_advisor_qualstats        | view  | enterprisedb
 public | query_advisor_qualstats_all    | view  | enterprisedb
 public | query_advisor_qualstats_pretty | view  | enterprisedb
 public | testtable                      | table | enterprisedb
(6 rows
Connect with any other node in Region B so that we can make sure the table created in Region A is also getting replicated in Region B so we can connect with karaoke
enterprisedb@karaoke:~ $ psql -h karaoke -p 6432 -d bdrdb
psql (16.3.0)
SSL connection (protocol: TLSv1.3, cipher: TLS_AES_256_GCM_SHA384, compression: off)
Type "help" for help.
bdrdb=# d
                       List of relations
 Schema |              Name              | Type  |    Owner
--------+--------------------------------+-------+--------------
 public | pg_stat_statements             | view  | enterprisedb
 public | pg_stat_statements_info        | view  | enterprisedb
 public | query_advisor_qualstats        | view  | enterprisedb
 public | query_advisor_qualstats_all    | view  | enterprisedb
 public | query_advisor_qualstats_pretty | view  | enterprisedb
 public | testtable                      | table | enterprisedb
(6 rows)
Lets now try to insert data inside this table from Region B and see the replication to region A
Connect with karaoke and insert some data
enterprisedb@karaoke:~ $ psql -h karaoke -p 6432 -d bdrdb
psql (16.3.0)
SSL connection (protocol: TLSv1.3, cipher: TLS_AES_256_GCM_SHA384, compression: off)
Type "help" for help.
bdrdb=# insert into testtable values (1);
INSERT 0 1
Let’s see if data in this table is visible in the same region B so let’s connect with karakul
enterprisedb@karakul:~ $ psql -h karakul -p 6432 -d bdrdb
psql (16.3.0)
SSL connection (protocol: TLSv1.3, cipher: TLS_AES_256_GCM_SHA384, compression: off)
Type "help" for help.
bdrdb=# select * from testtable ;
 id
----
  1
(1 row)
Yes data is replicated to the node in the same data center
Now let’s try to connect with a node from region A and see if data is present there as well or not
So let’s connect with kaftan
enterprisedb@kaftan:~ $ psql -h kaftan -p 6432 -d bdrdb
psql (16.3.0)
SSL connection (protocol: TLSv1.3, cipher: TLS_AES_256_GCM_SHA384, compression: off)
Type "help" for help.
bdrdb=# select * from testtable ;
 id
----
  1
(1 row)
Hence our Multi-Master replication is working fine here
Testing Failover
Lets try to bring write leader down in region A which is Kaftan
[ec2-user@kaftan ~]$ sudo systemctl stop postgres
Lets now see group status
enterprisedb@kaboom:~ $ pgd show-groups
Group                Group ID   Type   Parent Group Location    Raft  Routing Raft Leader Write Leader
-----                --------   ----   ------------ --------    ----  ------- ----------- ------------
test_cluster         1409411352 global                          true  false   kaboom
datacenter1_subgroup 1488060427 data   test_cluster datacenter1 true  true    kaolin      kaolin
datacenter2_subgroup 2299288850 data   test_cluster datacenter2 true  true    karaoke     kaput
datacenter3_subgroup 4066894510 data   test_cluster datacenter3 false false
PGD immediately promoted kaolin as a new write leader Please note that because we performed failover in Region A so next write leader chosen by PGD was also from region A. Similarly if we are to perform the failover from region B then PGD will select a new write leader from region B only. Hence our failover is also working fine
NOTE: After the first failover if another node fails in Region A, PGD won’t be able to promote the third node as the next write leader. Consequently, the third node will hang, and we won’t be able to connect to it. This happens because PGD selects a new write leader through a voting process among the nodes. For the election to occur, a majority of nodes is required. With only one node left, PGD cannot conduct the election, causing the third node to stop functioning.
Backups
Inside each Region, we have a dedicated node for backups. The reason for having 2 backup nodes is to minimize the node failure scenario. If our backup node from Region A fails so we will still have another node in Region B and we won’t loss our backups
Let’s try to connect the backup node from Region A
For backup node i have an entry inside my config.yml like that
- Name: kapok
  location: datacenter1
  node: 4
  role:
  - barman
  volumes:
  - device_name: /dev/sdf
    encrypted: true
    vars:
      volume_for: barman_data
    volume_size: 128
    volume_type: gp2
Now connect with kapok
ssh -F ssh_config kapok
Switch the user to barman
sudo su barman
Barman’s main configuration file is available at /etc/barman.conf. And server file is located at /etc/barman.d/
In my case I have this file /etc/barman/barman.conf/kaboom.conf means this node is taking backups from kaboom
Check the backup server status
bash-4.4$ barman check kaboom
Server kaboom:
PostgreSQL: OK
superuser or standard user with backup privileges: OK
PostgreSQL streaming: OK
wal_level: OK
replication slot: OK
directories: OK
retention policy settings: OK
backup maximum age: OK (interval provided: 7 days, latest backup age: 27 minutes, 7 seconds)
backup minimum size: OK (72.3 MiB)
wal maximum age: OK (no last_wal_maximum_age provided)
wal size: OK (0 B)
compression settings: OK
failed backups: OK (there are 0 failed backups)
minimum redundancy requirements: OK (have 3 backups, expected at least 3)
ssh: OK (PostgreSQL server)
systemid coherence: OK
pg_receivexlog: OK
pg_receivexlog compatible: OK
receive-wal running: OK
archiver errors: OK
To take the new backup run
bash-4.4$ barman backup kaboom
Starting backup using rsync-concurrent method for server kaboom in /var/lib/barman/kaboom/base/20240522T164637
Backup start at LSN: 0/C000028 (00000001000000000000000C, 00000028)
Starting backup copy via rsync/SSH for 20240522T164637
Copy done (time: 1 second)
Asking PostgreSQL server to finalize the backup.
Backup size: 74.2 MiB. Actual size on disk: 15.7 MiB (-78.83% deduplication ratio).
Backup end at LSN: 0/C0140E8 (00000001000000000000000C, 000140E8)
Backup completed (start time: 2024-05-22 16:47:35.668097, elapsed time: 4 seconds)
Processing xlog segments from streaming for kaboom
00000001000000000000000C
to list down all the backups run
bash-4.4$ barman list-backup kaboom
kaboom 20240522T164637 - Wed May 22 16:47:37 2024 - Size: 74.3 MiB - WAL Size: 0 B
kaboom 20240522T161827 - Wed May 22 16:18:29 2024 - Size: 72.3 MiB - WAL Size: 1.1 MiB
kaboom 20240522T161819 - Wed May 22 16:18:21 2024 - Size: 72.3 MiB - WAL Size: 36.2 KiB
kaboom 20240522T161806 - Wed May 22 16:18:08 2024 - Size: 72.3 MiB - WAL Size: 36.2 KiB
By default, barman is set up to take 2 backups each week 1 on Saturday and 1 on Wednesday
Barman cron job files
bash-4.4$ cat /etc/cron.d/barman
# m h  dom mon dow   user     command
* * * * * barman /etc/tpa/barman-home-ok && /usr/bin/barman -q cron
bash-4.4$ cat /etc/cron.d/kaboom
#Ansible: Backup from server kaboom
0 4 * * wed,sat barman /etc/tpa/barman-home-ok && /usr/bin/barman backup kaboo
Connecting with PEM
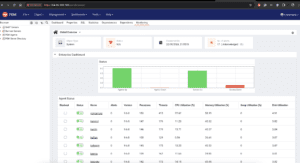
PEM (Postgres Enterprise Manager) is a management tool by EnterpriseDB for PostgreSQL databases, offering real-time monitoring, performance analysis, configuration management, automated backups, security management, and custom reporting to enhance database performance and administration efficiency. By default, TPA will install PEM on the 443 port
To connect with PEM open your browser and use the following link – Update this accordingly
https:<IP_ADDRESS_OF_PEM_SERVER>/pem
Username = enterprisedb
Get the password from this command
tpaexec show-password test_cluster/ enterprisedb
Where test_cluster is your main cluster directory created by the TPA configure command and enterprisedb is the username against which you want to extract the password
Subscribe to the Stormatics Newsletter
Subscribe to our newsletter, Stormatics Spotlight, for exclusive insights and community-driven expertise and get access to all things PostgreSQL every month.

